Note: For this demo I’m using a lab environment network that is not routed to the internet. I will be using the Fern WiFi Cracker open source wireless security tool included in the Kali Linux and Backtrack 5 r3 security distros. Before attempting to use Fern or any other utility in Kali or Backtrack please make sure to read the help and MAN pages for a complete description of the program options and switches. This demo is for wireless pentesting educational purposes and to emphasize the insecurities of using a weak or common dictionary word for wireless network authentication and encryption security key or passphrase.
Fern Wi-fi Cracker can crack WEP, WPA, and WPA2 secured wireless networks. Fern basically takes the command line utilities to crack these networks and puts them in a GUI. Very simple to use… scary easy! Fern also provides some extra functionality for hijacking sessions and locating a computers geolocation via its Mac address, but I have not tested with these features.
For this demo I will be using Backtrack 5 r3 running in VMware Workstation on a Win 7 host.
Originally I was using Fern in Kali and ran into some issues with my wireless adapter and with the program freezing or not opening after updating it. I have the fixes I discovered in another blog post for anyone else that may have these same problems.
Router Setup
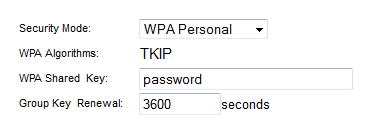
I’m using an old Cisco/Linksys 802.11g wireless router for this demo and all the settings are defaulted except the security settings, which I set to WPA Personal with a Shared Key passphrase of “password”. The word password should never be used for a real password or passphrase and I’m using it here since I know the Fern program will quickly crack it. In real world situations a WPA/WPA2 passphrase should be completely random and not a common dictionary word. For help on creating a secure WPA/WPA2 passphrase please read my earlier blog post.
Setup the Wireless Adapter
Plug in the USB wireless adapter (I’m using the Alfa AWUS036H 802.11b/g USB wireless adapter) and open the Terminal and run iwconfig to verify the USB adapter interface.

On occasions I have had to bring the wireless adapter interface up using the following command.
#ifconfig wlan0 up
Starting the Fern Program
To start Fern from the Terminal type in the following commands
#cd /pentest/wireless/fern-wifi-cracker
#python execute.py
or start Fern via the GUI using the Backtrack menu
Applications/Backtrack/Exploitation Tools/Wireless Exploitation Tools/WLAN Exploitation/fern-wifi-cracker
Using the Fern Program
Select the Interface and Fern enables monitor mode. If your wireless interface does not show in the list hit the Refresh button and try again.

Before starting the scan double-click on any blank area of the Fern home screen to bring up the Access Point Scan Preferences screen. You can set the channel option to scan a single channel or leave it at the default All Channels. One nice feature is to check the Enable XTerms option which will have Fern open up the Terminal windows during its usage to see what the program is doing in the background. Click OK when done.

Back on the Fern home screen click the Scan for Access points button.

Two Terminal windows will open; one showing the WEP enabled networks (no screen shot), and another showing the WPA enabled networks. The top part of the WPA Scan Terminal window shows the networks being found, and the lower part shows any connected client devices. For a WPA attack to work it requires a connected client. The most important part of the attack will kick the client off the wireless network and capture the 4-way handshake when the client device re-authenticates to the network. If the network you want to pentest has no connected client your out of luck!

On Ferns home screen the networks being detected will start populating next to the WiFi WEP or WiFi WPA buttons. (I have been seeing less and less WEP enabled networks, so that is a good thing!)

Clicking on the WiFi WEP or WiFi WPA button will bring up the Attack screen and the top pane will list the networks found. Select the AP to crack, but before clicking the Attack button to the right let’s go over a couple of settings.

I will use the Regular Attack option, but there is a WPS Attack option and I believe Fern uses the Reaver utility to launch the WPS attack. You can read more about Reaver by clicking here.
Common.txt is the wordlist that comes with the Fern program, but any wordlist you download or have created on your own can be used by hitting the Browse button and pointing Fern to the alternative wordlist file.

With the Regular Attack and the wordlist selected hit the Attack button.

Fern will start the attack and on the left side of the screen the attack steps will turn yellow as Fern works through the various steps. The most important step is capturing the 4-way handshake and Fern will open an aireplay-ng Terminal window showing the progress of deauthentication (if XTerms is checked in the preferences) of the connected client.

It may take several attempts to deauth a client and capture the 4-way handshake.

Once Fern has captured the handshake it will start the bruteforce attack. Viola! If the WPA key is in the wordlist being used it will display the found key in Red.

As I mentioned I setup a passphrase I knew would be found quickly, and from start to finish this attack took under 4 minutes!
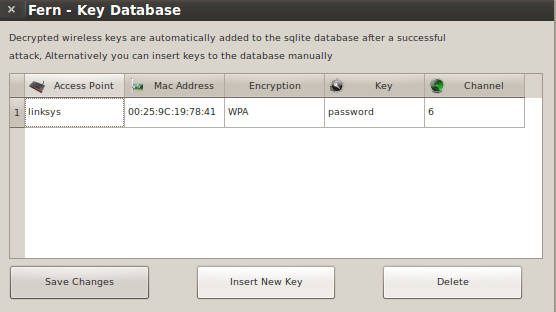
Back on the Fern main screen is a Key Database button and it now shows one entry.

Clicking the Key Database button will display the found keys.
Conclusion
Using a common dictionary word for a WPA or WPA2 passphrase makes it easier to hack with utilities like Fern. The Fern utility is free to download and simple to use, and not everyone is going to use it for legit wireless pentesting purposes.
With possession of the WPA key a person can associate to network and have a gateway to the internet, or they could launch other attacks. For example, with possession of the WPA key the attack could be expanded to include decryption of the data traffic of the legitimate clients on the wireless network.
Thanks for reading and stay wireless secure!


